Riccardo Loggini
CMake in Visual Studio
Table of Contents
Why Using CMake
CMake is a tool that allows us to generate project files from our code for a multitude of different environments. By using it we are not tied anymore to a specific IDE environment, like Visual Studio (or a specific version of it), or NetBeans, or CLion, because the project files are going to be independently generated using CMake.
We can dictate the project structure in a platform-agnostic manner, so whoever downloads our code can generate the solution project files as we initially planned, regardless of the chosen environment.
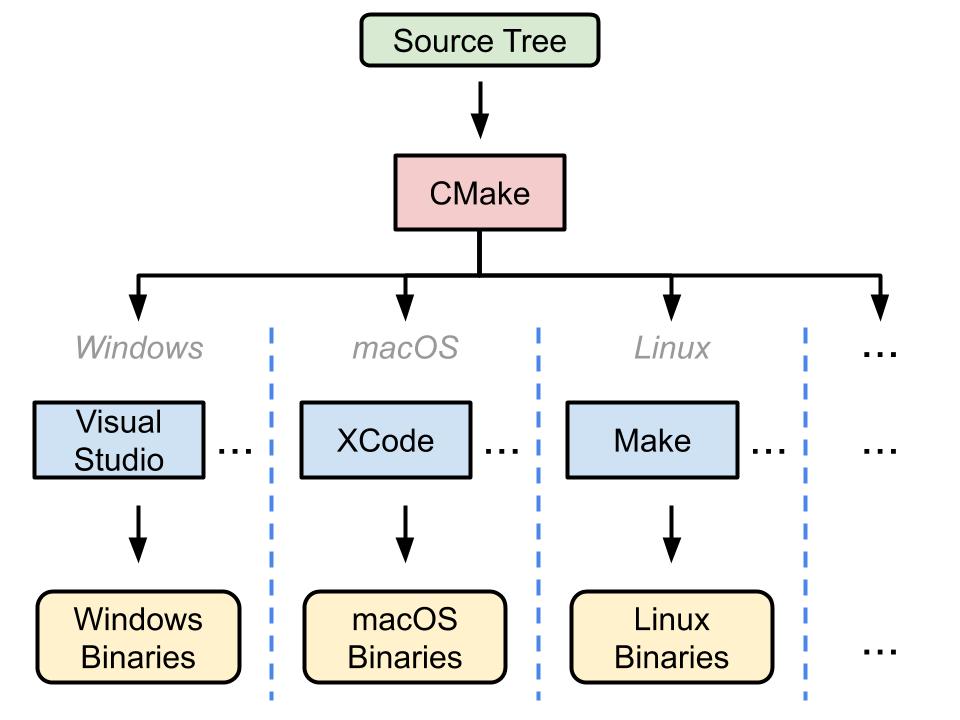
CMake real job is configuring and using the Native Build Tool (the set of IDE+compiler environment), depending on some platform-agnostic instructions given by the programmer.
NOTE: It is important to understand that when using CMake, we are placing it “in charge” of the project configuration, that means that every change to the project configuration should be done in CMake and not in the IDE (for example) anymore. Any configuration hange made outside CMake will be unsafe, because it will be local and probably deleted when CMake is run again.
Generally we should make sure that the version of CMake that we are using got released after the compiler we are using, just to increase the chance we have all the possible updated tools at our disposal. At the time of writing this article, VisualStudio 2019 is using CMake 3.16.
Scope of the Article
The scope of this article is giving a basic but complete understanding of the CMake tool, with a focus on Visual Studio environment, in order to set up a fairly simple project. CMake offers a multitude of tools which are much more in number than the ones described in this article, many of which goes beyond the scope of a base environment setup.
Base Concepts
The fundamental objective in CMake is defining a list of Targets and defining Properties in them.
-
Targets model the components of our application: an executable is a target, a library is a target. By default, in Visual Studio Solution they will correspond to a Project each.
Our Application is build as a collection of Targets that depend on and use each other. -
Targets have Properties: the source files a target is built from, the compiler options it requires, the libraries it links against.
We also have Global Properties that will be applied by default to every target we define, such asset(CMAKE_CXX_STANDARD 11)that will tell CMake to look for a C++11 compiler version. -
Projects are sets of targets. In Visual Studio they correspond to an entire Solution each.
-
Root Folder is intended as the folder that contains the principal CMake script that will be used to start any operation. This script has the canonical name of CMakeLists.txt.
- Subdirectories are special targets representing a root’s subdirectory each, and they can be declared by the command
add_subdirectory( SubDirName ).
If CMake finds a script inside that subdirectory it will execute it straight away at the moment of the function call. In this second script, all the variables defined before will be available to be queried.
This is helpful to decouple CMake script instructions so each script becomes less verbose and easier to read. A subdirectory is a target itself and can contain CMake scripts that define multiple targets. The main advantage of this mechanic comes when the subdirectory defines some target that we need: we can just link the subdirectory target to our program and CMake will take care of wiring everything up. - Modules are standalone groups of optional script functionalities that we can include. There is already a list of modules that come with CMake by itself, but we can always implement our own modules (still, this goes beyond the scope of this article). Modules are also list files like CMakeLists.txt, but usually are found stored in memory with a .cmake extension.
Modules included in CMake can be- Utility Modules loaded with the include() command will add utility standalone functions.
One example is CMakePrintHelpers that will add console print utility functions, useful for debugging purposes. - Find Modules (see packages below) loaded with the findpackage() command will search for third-party software and provide usage interfaces for them.
One example is FindOpenGL that will define variables and targets describing the version of OpenGL currently installed (if found).
- Utility Modules loaded with the include() command will add utility standalone functions.
-
Build Types (Configurations) are sets of properties and variables that alter the project structure and code to adapt to specific situations, like different platforms or levels of optimization.
- Packages are mostly used to add project dependencies, in the form of Imported Targets and/or script variables related to that dependency. Packages can be:
- Config-file Packages are the ones that were generated with an install operation inside our solution’s source tree. That means the source tree includes all the source files of such dependency, like adding the math library glm as a git module dependency, then perform install on it and call add_package(..) in our script.
Each of them provides a configuration file used when the package gets added. - Find-module Packages are modules with a set of rules to find the required bits of a dependency, when the required headers and libraries are located outside the current source tree. For example, finding and adding OpenGL dependency can be done with a find-module conveniently included in the standard version of CMake.
- Config-file Packages are the ones that were generated with an install operation inside our solution’s source tree. That means the source tree includes all the source files of such dependency, like adding the math library glm as a git module dependency, then perform install on it and call add_package(..) in our script.
CMake Stages
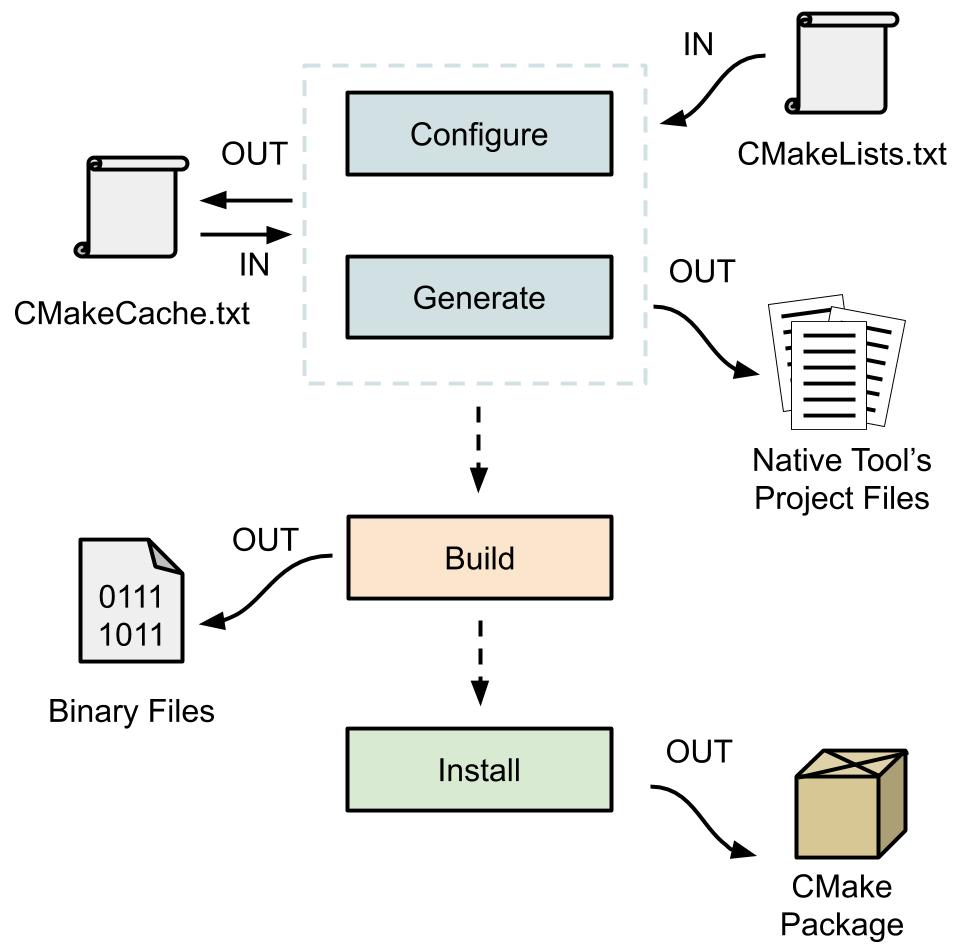
-
Configure stage will compile the CMake script CMakeLists.txt we wrote and update cache variables in CMakeCache.txt file, described later.
-
Generation stage happens right after configure, without a choice, and it will generate project files for each defined target based on our configuration stored in CMakeLists.txt.
-
Build stage will build our project, like we would build it in Visual Studio IDE, based on the generated configuration files. The selected Generator (another name for the Native Build Tool, that declares compiler+IDE environment) is used to build the configured project in the Build Directory. Build stage with CMake is optional since, once the generation stage is completed, we will be able to open the solution with our IDE and build it from there.
-
Install stage will prepare our projects to be easily reused in other CMake driven code bases. Using more technical terms, it will create CMake packages out of our code so we will be able to include it somewhere else by first packing it and then using find_package(..) function. This facilitates the inclusion of external project dependencies and it makes the CMake scripts much less verbose.
Install stage is completely optional and we could have stopped at the build stage.
Scripting Tools
Variables
Variables in CMake scripts are defined with set command set(MyVarName “variable value”), optionally include CACHE STRING after the value to save it in CMakeCache.txt, described in the next chapter.
To dereference a variable we can use the dollar-brace syntax ${MyVarName}.
Dereferencing can be nested, so the value of a variable can be used as a part of a variable name to be dereferenced: ${MyVar${MyName}}.
All variables outside cache, have a scope and a lifetime. The scope is tied to the directory in which it was defined and it will be available on each of its subdirectories.
Constructs like functions also create a child scope.
By using the set function with PARENT_SCOPE after the value, we will set it for the scope that opened the current one (and NOT for the current scope or for the parent-of-parent scope). This is also the way in which a function in CMake is able to return a value (aside from setting a value in cache).
NOTE: If a variable is not found in the current scope, it will be searched in cache automatically!
NOTE: Any subsequent value that we assign to a cached variable, will automatically update the corresponding value in cache!
The general recommendation with variables naming convention is use unspaced lower case for current scope only variables (e.g. ${myvarname}) and full underscore-spaced upper case (e.g. ${MY_VAR_NAME}) for variables used along many scopes.
Additionally, all cache variables (having global scope) should be pre-fixed with the name of the project they belong to and an underscore, in order to avoid inter-project name clashing, eg. PROJNAME_MY_VAR.
Lists have elements separated by semicolons in a single string, e.g. “a;b;c” represents a list with 3 elements. We can define them by set or list command that includes also many list operations.
IF Statements & Loops
CMake has its own conditions for IF statements that we can use, where
if(statement)
    doSomething()
else/elseif
    doSomethingElse()
endif()
Where statement can be
-
Constant’s name, true if its value is 1, ON, YES, TRUE, Y or a non-zero number.
-
Variable’s name
${myVariable}, true if defined to a value that is not a false constant, so not one of 0, OFF, NO, FALSE, N, IGNORE, NOTFOUND, the empty string “”. -
A condition along with possibly unary (e.g. EXISTS, DEFINED), binary (e.g. EQUAL, LESS, GREATER) and boolean (e.g. NOT, AND, OR)
NOTE: This means that if statements will evaluate the string content of a variable, and will react differently based on some specific string values.
Loops are also present in CMake. Just to name the one that can turn most useful, foreach loop can iterate through a list, like
foreach( currentvar IN mylist )

doSomething()

endforeach( currentvar )
And there is also the option to iterate through a generated list of items, like in python, by using the RANGE option.
Generator Expressions
Generator Expressions are CMake commands that are evaluated during build system generation. They allow us to change value of variables depending on many factors, such as the selected configuration (e.g. Debug Win64 instead of Release Win64) to build.
While most of the commands happen at configure time, with generator expressions we can decide something at build or install time as well.
Boolean Generator Expressions are the ones in the form $<conditionType:arguments>
which represents an IF statement that can return either 0 or 1, depending if the condition is met.
-
Logical Operators are the ones where conditionType is a boolean operation and arguments the arguments to evaluate with that operation. E.g
$<AND:1;1;0>will return 0 as the AND operation between 1, 1 and 0. -
String Comparisons are the ones where conditionType is a string comparison operation and arguments the strings to evaluate (separated with a comma). E.g.
$<IN_LIST:z,a;b;c>will return 0 because z is not contained in the list [a,b,c] -
Variable Queries are the ones where conditionType is a condition on a variable/list, and arguments is that variable/list. E.g.
$<CONFIG:cfg>will return 1 if cfg content matches the name of the current configuration.
String-Valued Generator Expressions expands to (returns) some string. They can come in different forms depending on type
-
Escaped Characters in the form of
$<myEscapedChar>will return a special character that otherwise will be interpreted for other constructs. E.g.$<SEMICOLON>will return “;” used to avoid getting interpreted as list element separator. -
Conditional expressions in the form of
$<condition:returnString>or$<IF:condition:returnString>will resolve in returnString if the condition is met. E.g.
$<$<CONFIG:Debug>:DEBUG_MODE>If current configuration is debug it will resolve in DEBUG_MODE, otherwise empty string. -
String Transformations in the form of
$<transformationType:arguments>will transform a string or a list of strings as transformationType dictates. E.g.$<UPPER_CASE:string>will resolve to the upper case version of string. -
Variable Queries in the form of
$<myVarQuery>will return the value assigned to myVarQuery for the current configuration. E.g.$<CONFIG>will return the current configuration name. -
Target-Dendent Queries in the form of
$<myVarQuery:myTarget>are Variable Queries that are dependent on the specified myTarget. E.g.$<TARGET_PROPERTY:myTarget,prop>will resolve in the value of the property prop of myTarget.
NOTE: Generator expressions can be nested, so for example, if we want to make a string case-insensitive to then compare it, we can do
$<STREQUAL:$<UPPER_CASE:${foo}>,”BAR”>will return 1 only if content of${foo}is BAR , bar, Bar, bAr etc..
NOTE: don’t query CONFIG and other configuration parameters at Configuration Time, because many IDEs don’t have that information ready up until Build Time.
Functions
Functions in CMake are quite different from the average programming language, in the sense that functions do not have a return value, but they rely on creating variables for the parent scope.
What it means is, we can define a variable inside the body of the function, and by declaring it PARENT_SCOPE, we will be able to use it in the scope where the function was called. E.g.
function(myFunctionName INPUT_VAR)
    set(${INPUT_VAR} “FilledVarContent” PARENT_SCOPE)
endfunction()

myFunctionName(myVar)

message(“Content of myVar is ${myVar}”)
Functions will add a child variable scope to the one that called it.
CMake uses a scripting language where every function argument is a string, there is no other type.
By calling ${INPUT_VAR} we are dereferencing the variable that corresponds to the string name “INPUT_VAR”.
By typing project(myProject VERSION 1.0.0) for example, it is the same as typing project(“myProject” “VERSION” “1.0.0”).
It will be a function’s responsibility to interpret that input correctly.
White space is a delimiter for different function arguments and it can be moved and shifted as we need.
We can pass any number of arguments to a function, like variadic functions in C++.
IF we expect any number of arguments, inside its body we are going to need to extract each value by calling cmake_parse_arguments.
Cmake_parse_arguments will first retrieve every passed value, and then create a variable for each one of them.
function(myOtherFunction)

cmake_parse_arguments(
VAR_PREFIX
“FIRST_OPT_KEY;SECOND_OPT_KEY”
“FIRST_V_KEY;SECOND_V_KEY;THIRD_V_KEY”
“FIRST_MULTIV_KEY;SECOND_MULTIV_KEY”
${ARGN}
)

endfunction()

myFunctionName(FIRST_OPT_KEY FIRST_V_KEY THIRD_V_KEY peppi SECOND_MULTIV_KEY alpha beta gamma)
Inside the body of myOtherFunction we will find the following defined variables:
VAR_PREFIX_FIRST_OPT_KEY = TRUE
VAR_PREFIX_SECOND_OPT_KEY = FALSE
VAR_PREFIX_FIRST_V_KEY = TRUE
VAR_PREFIX_SECOND_V_KEY = <UNDEFINED>
VAR_PREFIX_THIRD_V_KEY = “peppi”
VAR_PREFIX_FIRST_MULTIV_KEY = <UNDEFINED>
VAR_PREFIX_SECOND_MULTIV_KEY = “alpha;beta;gamma”
There are much more functionalities associated with cmake_parse_arguments, but the general structure is composed by
cmake_parse_arguments(<prefix> <options> <one_value_keywords>
<multi_value_keywords> <args>...)
where
- prefix will be prepended to every generated variable name
- options variables will Always be defined, to either true or false depending if they are found in the arguments.
- one_value_keywords contains the keyword which expect to be found in the arguments followed by only one value. IF not found in arguments, the variable will be Undefined.
- multi_value_keywords are the keywords that are expected to be found in the arguments followed by an arbitrary number of values. IF not found in arguments, the variable will be Undefined.
- args are the arguments that will be processed by cmake_parse_arguments.
${ARGN}is a special variable available inside the function body that returns the list of all the input parameters AFTER the ones that were expected. Similarly${ARGV}will hold the entire list of arguments (including the expected ones).${ARGC}returns the total number of arguments and${ARGV#}returns a specific input variable value, substituting # with a number from 0 to${ARGC}-1.
In the example above we were not expecting any argument, but we still use${ARGN}for the function to be easily extensible.
NOTE: The power of this system shows, for example, when the function is run in different stages, e.g. build vs. install of a specific configuration. When we pass variables as arguments, they can contain concrete values if we are computing one stage, or they can be undefined (resolving in empty string “”) when computing another stage. In this way the generated variables by our function will adjust according to what is defined at that specific time.
NOTE: There is also a Macro in CMake, similar to function but with some caveats on passed parameters and scope. For more information, visit the official documentation.
The CMake Lists
CMakeLists.txt is the only script file that is always necessary for CMake to work in our source tree.
We can have more than one CMakeLists, each one of them representing a directory or a subdirectory: by using the add_subdirectory(relative/path/to/subdir) in the main script, we tell CMake to search in that subdirectory for a CMakeLists script to execute, and if found it will be executed straight away.
It will follow a step-by-step of a CMakeLists configuration describing all the functions we use.
Version and Project
cmake_minimum_required( VERSION 3.1 )

project( ProjName )
The VERSION will also dictate the policy to use, so the rules that cmake will use when executing its stages. The specified version will dictate what policies to use when processing the script, even if we installed a newer version of CMake. Sometimes functionalities we use can result outdated or too new for the version of policy we are using, and that will throw warnings and errors. We can always create If statements checking what version we are using if(CMAKE_VERSION ...) to prevent any issue, or we can exclude particular policies by setting them old, via the cmake_policy function cmake_policy(SET <PolicyCode> OLD). We can even specify an entire CMake version of policies to use for the current project with cmake_policy(VERSION <VersionCode>) with any official version lower or equal than the current version of CMake we have installed.
Project( ProjName ) function will define the name of our project and ${ProjName_SOURCE_DIR} and ${ProjName_BINARY_DIR} variables will be automatically created and filled with the source and binary folder paths.
We use project to represent an undivisible set of targets.
NOTE: Using Visual Studio, a CMake project corresponds to an entire Solution. Similarly, each target (library or executable) will correspond to a different VS Project.
Project will also find and set the current compiler and so the language the project is using. Without specifying one, CMake will look for C and C++ compilers.
Additional settings are available, for those refer to the official documentation.
Adding a Target
Targets can be executables or libraries, so they get defined by
Where:
-
Target Name (that must be unique within a Project) represents both the name of the executable file generated, and the name of the CMake target created.
-
Source File List from which to build the target. Header files listed will be ignored by CMake, but we can list them to show up in the IDE.
Include Directories for a Target
We can specify additional include directories for when a given target is compiled or installed.
This target property is set with target_include_directories function:
target_include_directories( MyTargetName
    PUBLIC
        $<BUILD_INTERFACE:${CMAKE_CURRENT_SOURCE_DIR}/include>
        $<INSTALL_INTERFACE:include>
    PRIVATE
        ${CMAKE_CURRENT_SOURCE_DIR}/src
)
In this example, conditional expressions will decide what to include depending if we are acting a build operation (BUILD_INTERFACE) or an install operation (INSTALL_INTERFACE).
When an include directory is set as PRIVATE it is saying that it will be used in the implementation files of the target, and not in its public Api interface. Any code that makes call to the target will not need that include directory.
When an included directory is set in INTERFACE scope (nothing to do with the previous conditional expressions), it is saying that target’s implementation files will not use that include directory but it will be only used for its public Api interface (opposite to PRIVATE).
When an include directory is set as PUBLIC it will be a combination of PRIVATE and INTERFACE keywords.
NOTE: don’t add unneeded PUBLIC requirements, make PRIVATE whenever possible. This can be debugged with enabling build warning with commands like “-Wall” (warning all).
The directories specified in this way will be available as relative path for our #include headers.
For example when we build a project, all the headers files and folders containing headers inside ${CMAKE_CURRENT_SOURCE_DIR}/include will be available to get included in our code files, so if we had a folder Peppi inside include that contains Pear.h, then in our source file we can directly write #include <Peppi/Pear.h>.
Handling Properties
Properties relative to a target can be set with set_property or set_target_properties, for example
set_property(TARGET MyTargetName
PROPERTY MyPropertyName MyPropertyValue)

#And we can read back a property value with

get_property(MyOutputVariable TARGET MyTargetName PROPERTY MyPropertyName)
For a complete list of already defined properties belonging to global scope, a target or a directory, refer to the official documentation.
Adding and Linking a Library
If we want to build our own libraries inside a project, they will become a target and once created, we can link them to executable targets.
The most generic code to add and link a library to an executable target is
add_library( myLibraryName ${myLibrarySourceFiles} )

target_include_directories( myLibraryName ${myLibraryIncludeDirectory} )

target_link_libraries(myTargetName PRIVATE myLibraryName)
By default add_library will build as a Static Library. We could also specify SHARED options in add_library but that is considered not a good practice in general, and it should be used only if that particular library cannot be built in any other way than shared (for some reason).
What we should do instead, if we want to build our libraries as dynamic, we should use the global flag BUILD_SHARED_LIBS and set it to ON (default is OFF).
The linking operations goes under Transitive Usage Requirements meaning that a dependency should usually be defined PRIVATE if it is used just by that target.
If we are building a library and its header files also uses the library we are linking, then we should specify the linkage as PUBLIC dependency.
If the library we are building is not using the library we are linking but the headers still need that library, then we should specify the linkage as INTERFACE dependency.
We can also use a target subdirectory to represent a set of libraries to link to the main target.
add_subdirectory(mysubdir)
add_executable(myprogram main.cpp)

target_link_libraries(myprogram mysubdir)

Where the CMakeLists.txt in the subdirectory has:
add_library(myLib1 Lib1.cpp)

add_library(myLib2 Lib2.cpp)
In this way, the subdir target mysubdir will make myLib1 and myLib2 to be linked to myprogram executable target.
This happens because library dependencies are transitive: when a target is linked to another, all the linked libraries of the first one become linked to the second one. This link is stored in INTERFACE_LINK_LIBRARIES target property which can be also manually edited.
When we operate a script inside a subdirectory we will automatically create a source and binary subfolder to the respective root one. These variables ${CMAKE_CURRENT_SOURCE_DIR} and ${CMAKE_CURRENT_BINARY_DIR} represent those newly created subfolders, while we can always fetch the source and binary root folder with ${CMAKE_SOURCE_DIR} and ${CMAKE_BINARY_DIR}.
Imported Target Libraries
When we have a dependency from a library outside current source tree, for example OpenGL library for a render engine, we will need to use Imported Targets.
In most cases, imported targets are the result of executing a cmake find-module.
We can always define a find module ourselves that will search a library we need in the current machine and returns an imported target and/or CMake variables that give information about that library. Creating a find-module goes out of scope of this article, but there are already many find modules available on the internet for the most common libraries.
CMake ships with a number of example find-modules, including one to find OpenGL and its utility libraries called “FindOpenGL”.
We can execute the find-module by calling find_package() function and after that we can link the target as a normal library.
find_package(FindOpenGL REQUIRED)

target_link_libraries(myTargetName PRIVATE OpenGL::GL)
The REQUIRED option stops the processing of the script if the library cannot be found.
The CMake Cache
CMake has support for cached options: they will be stored in file CMakeCache.txt and loaded the next time we use CMake with the current solution. This is the way Cmake remembers anything we set.
The scope of these variables is global, unlike the variables defined in CMakeLists.
Every time we reference a variable, it will be first searched in the current scope, and if not found it will automatically be searched in cache.
Variables are set in cache with set(MY_VAR "peppi" CACHE STRING "") where “peppi” is the default value assigned if we do not find myvar variable in cache. If myvar was found in cache (for example, the second time we run the script with that statement) then that set function will do nothing, unless we specify FORCE (NOT recommended to use, as it is an anti-pattern). The STRING specifies the type of data that we store, but that is used only in specific cases like the CMake GUI to better display cached data, because again, in the end all values are strings.
To remove a variable from cache we can use unset(MY_VAR CACHE).
CMakeCache.txt is automatically generated each time we change CMakeLists.txt and it contains all of the CMake variables that define how the project is generated.
We can manually edit CMakeCache by right-clicking CMakeLists in solution explorer->Cache->View CMakeCache
The CMake Settings
CMakeSettings.json will store build configurations that will be used to generate command line arguments for executing CMake.exe (for either configure, build, install or other CMake operations). Such configurations will also be used to configure Intellisense accordingly.
If we use the Visual Studio multi-configuration generator (opposed to single-configuration like Ninja or Make), by default all the possible configurations will be created and stored at generation stage.
If we still want to use a platform independent generator like Ninja and to continue using CMake to drive the project entirely, Visual Studio provides the so called Open Folder mode, which is a way that opposes the usual Solution (.sln) and relies on what is found in folder content instead.
NOTE: We could have used CMake with the VisualStudio generator to generate project files and we would be finished with it. There is no need for additional files like the CMakeSettings.json because Visual Studio can take care of all internally with the usual Solution mode. The disadvantage of it is that we will remain tied to the Visual Studio environment which might be a relevant factor if we plan to support multiple platforms. If we are in this last case, using Open Folder mode is preferable instead.
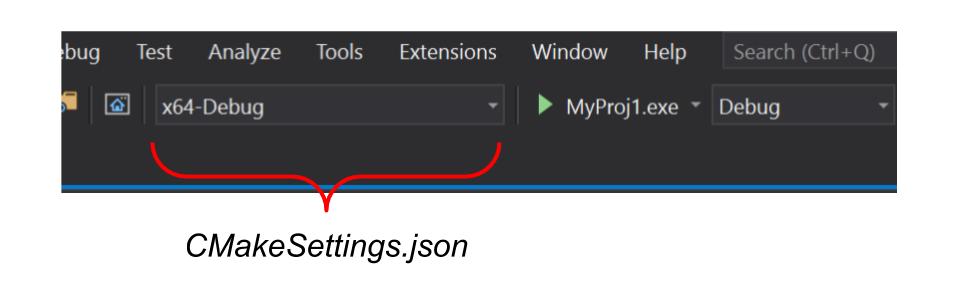
CMakeSettings.json is a file exclusive to Visual Studio and it is where the build configurations and compiler environment are stored. In this way, we can still use those generators in Visual Studio but the multiple configuration settings will be stored in CMakeSettings instead.
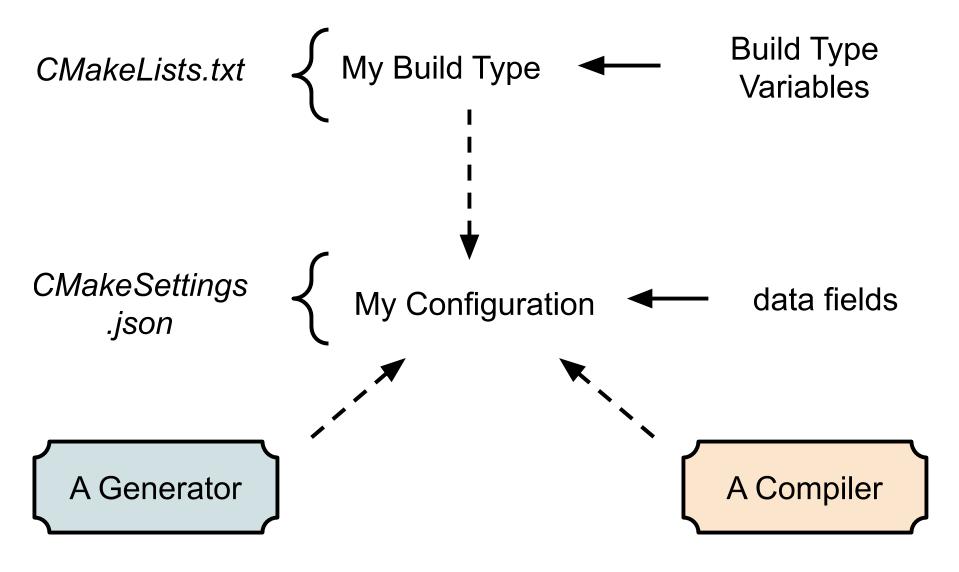
A Build Configuration specifies a set of properties to adapt the project to a specific platform or a different level of optimization, e.g. PS4 Debug vs Development Editor vs Release Client.
Each configuration specifies an Environment which stores information about compiler toolset (e.g. MSVC vs Clang).
CMake is set to generate Build/Configuration Types (the CMake way to create configurations), found in CMAKE_CONFIGURATION_TYPES . For each one of the build types, a set of variables will be automatically generated: the list can be found in the official documentation (the ones with
We can always define build types ourselves in CMakeLists.txt scripts, but this goes beyond the scope of this article.
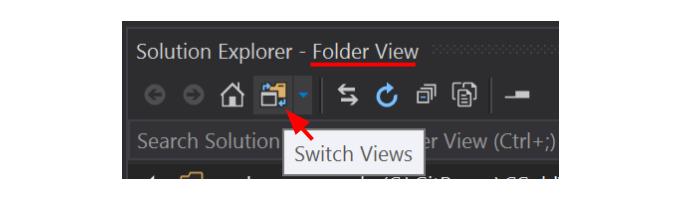
We can access CMakeLists in the IDE by right-clicking CMakeLists in Solution Explorer(Folder View) -> CMakeSettings.
Each configuration in CMakeSettings.json will look like this:
{
"name": "x64-Debug",
"generator": "Ninja",
"configurationType": "Debug",
"inheritEnvironments": [ "msvc_x64_x64" ],
"buildRoot": "${projectDir}\\out\\build\\${name}",
"installRoot": "${projectDir}\\out\\install\\${name}",
"cmakeCommandArgs": "",
"buildCommandArgs": "-v",
"ctestCommandArgs": "",
"variables": []
}
Where:
-
Name: of the configuration, the one that will appear in Project Settings drop-down menu
-
Generator: the one used to create the build scripts, value of this property maps to -G command of CMake tool. Among all Visual Studio supported generators, we mention:
- Ninja: a light-weight build system with focus on speed
- Visual Studio 16 2019 [ARM|Win64]: uses the visual studio MSBuild and toolchain. If no platform is specified in the name of the generator, the application will be built for 32-bit platforms. Append ARM to the generator string to target ARM devices or Win64 to target Intel 64-bit platforms.
- Unix Makefiles: This generator may only be available if the Linux development with C++ workload was selected when installing VisualStudio. It generates build scripts for applications to run in a Linux environment.
-
configurationType: specifies the Build Type for this configuration. We can define our own build types in CMakeLists but the default generated ones are:
- Debug: debug symbols will be generated and no optimizations (/Od).
- Release: optimizations enabled (/O2) and no debug symbols.
- RelWithDebInfoexample
- MinSizeRel: similar to release but optimizations that reduce size will be enabled (/O1)
-
inheritEnvironments: an array of strings that specifies which Environment Variables are inherited when the configuration is run.
These environment variables will be used in the process that Visual Studio uses to invoke cmake.exe. For example, selecting msvc_x64_x64 environment is equivalent to running the Visual Studio Command Prompt with -arch=amd64 -host_arch=amd64 command line args.
This is only required in some generators like Ninja. When using Visual Studio generators, the Build Environment is specified using the platform specification that is appended to the generator name.
The selected environment will define a set of environment variables in form of value-pair and referenced in those scripts with$ENV{variable_name}syntax. The list of defined variables depends on the selected environment and some of those variables will be also available inside CMake scripts due to its introspection system.
The list of variables for a certain environment can be seen by typing SET in the relative configuration command prompt, as the official documentation states.
Among the pre-defined environments available we mention:-
msvc_x64_x64: Target x64 Windows with the MSVC compiler.
-
linux_x64: Target x64 Linux remotely.
-
buildRoot: The folder where the generated Build Scripts are stored. The CMAKE_BINARY_DIR variable will be set to this value when generating configuration files. Since the generated build script should not ship with your code, make sure this folder is excluded from the current source control (e.g. Git ignored).
-
-
installRoot:The folder where the Build Targets will be placed when the install command is executed.
CMake creates Build Targets which represent “entities” to be built for each executable.
E.g. the “all” build target will include everything when built.
The CMAKE_INSTALL_PREFIX CMake variable will contain the install root path when generating configuration files. -
cmakeCommandArgs: additional command line args to pass to CMake when running configure-generate stage.
-
buildCommandArgs: additional command line args to pass to CMake when running build stage. For example the “-v” command-line arg causes Ninja to display all the commands being executed while building (verbose logging). MSBuild generators have a list of build command args available in the official reference.
-
ctestCommandArgs: additional command-line args to pass to CTest when running tests.
-
variables: an array of (name,value) pairs that are passed to CMake when running build stage. These variables will be sent to CMake as -D
= command-line args and can be used to specify values for cache variables that are used to generate the CMakeCache.txt file. E.g. "variables": [ { "NINJA_STATUS": "[%f/%t %es] " } ]Is used to specify the progress status message that is printed in the command line before a Ninja build rule is executed. In this case it will print:
- Number of Finished Rules (%f)
- The total number of Rules that need to run to complete the build (%t)
- The elapsed time in seconds (%s)
NOTE: From Visual Studio 2019 there is a CMake Settings Editor that let us edit CMakeSettings.json with a visual interface.
Macros Available in CMakeSettings.json
A list of Visual Studio macros is available for us to insert in the CMakeSettings
${name}: The name of the current configuration block${generator}: the name of the CMake generator used in the current config block${workspaceRoot}: path to workspace root folder${workspaceHash}: hash of the workspace folder. Used to create a Unique Identifier for the current workspace${projectFile}: full path to the root CMakeLists.txt file${projectDir}: full path to the folder that contains the root CMakeLists.txt${thisFile}: full path to the folder that contains this file CMakeSettings.json
System Environment Variables
System Environment Variables are per-project variables that we can use in Visual Studio configuration to make it dynamic and less verbose, any time there is a text field.
These variables use the notation $(<VarName>).
One of the most common system environment values is $(ProjectDir) that will return the full path to the folder containing the project we are writing the configurations for.
They are also available in CMakeSettings.json by calling ${env.<var_name>}.
We have different System Environment Variables, and/or different values associated with them, for each Project in our solution.
To check the list of system environment variables, in a Solution project type, for a specific project (and the values associated to them) go to Project Properties->VC++ Directories->(select one of the fields and press the arrow on the right) ->Edit..->Macros(on the bottom right).
To see the full list of defined system environment variables for the current Solution refer to the official documentation.
The “environments” Block
The “environments” block in CmakeSettings.json allows us to define new, or change value to existing, System Environment Variables. That means they will be instantly available to EVERY “configuration” block entry defined down the line. E.g.
"environments": [
    {
    "NINJA_STATUS": " My Ninja Status variable common to every configuration block"
    }
],
"configurations": [
{ … }
NOTE: Some of those system environment variables are used by the system, like NINJA_STATUS will be used by Ninja to format the build status string.
NOTE: We can use the “environments” block or the “variables” field to directly specify some of the other fields to CMake!
E.g. instead of specifying the same:
"buildRoot": "${projectDir}\\out\\build\\${name}"
field for every configurations, we just specify:
"BUILD_ROOT": "${env.USERPROFILE}\\CMakeBuilds\\LearningCMake\\build\\${name}"In the “environments” block.
Then defining buildRoot as“buildRoot”:”${BUILD_ROOT}”.
NOTE: we can override entries in the environments block on a per-configuration basis, just by adding a
“environments”: [{ .. }]field inside a specific configuration.
The Debug&Launch Settings
launch.vs.json is used to pass arguments to an executable at debug time.
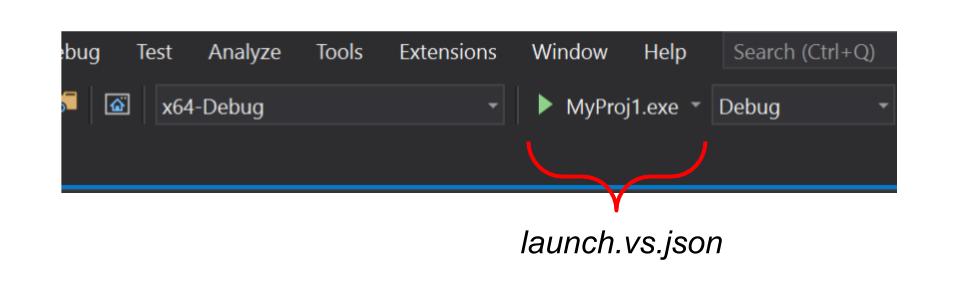
By default, the Startup Item drop-down will show ALL executable CMake targets found: by pressing it we will start the Visual Studio debugger with the selected target.
NOTE: As CMakeSettings.json, launch.vs.json is also a utility tool for Visual Studio’s Open Folder Mode, that opposes the usual Solution (.sln, .vcxproj) configuration to let CMake handle the whole configure-build-debug pipeline of our program. This comes handy if we plan to develop our project for different environments/platforms. If instead we plan to stay with Visual Studio, this file will not be needed and we can stick with Solution mode.
If we want to launch a specific CMake target and specify settings about it we can create a custom entry by:
Switch to CMake Targets View of the Solution Explorer -> right-click the CMake target we want to debug -> Debug and Launch Settings -> click on the first entry.
That will bring us to launch.vs.json with a new entry related to the selected target.
Alternatively, we can just edit the file ourselves from scratch:
first create it by right-clicking CMakeLists.txt in solution explorer->Add Debug Configuration->Default.
Then to open it, right-clicking CMakeLists.txt in solution explorer->Open Debug and Launch Settings.
The file launch.vs.json has a structure like the following
{
"version": "0.2.1",
"defaults": {},
"configurations": [
    {
    "type": "default",
    "project": "CMakeLists.txt",
    "projectTarget": "MyExecutableTargetToRun",
    "name": "CMakeLists.txt"
    }
]
}
Where:
- type: can be either “default” so the target being debugged is an executable, or “dll” the target being debugged is a dynamic link library.
- project: the CMakeLists file name where the target executable is specified.
- projectTarget: the path to the executable target being debugged.
- name: the name that is used in the Startup Item menu in the main toolbar.
- args: command line args to pass to the current configuration
- currentDir: the current working directory during debugging. When we hard code a file path in the source code it should be relative to the current working directory.
NOTE: all the variables available in CMakeSettings.json are also available in launch.vs.json with the addition of
${buildRoot}and${installRoot}.
NOTE: launch.vs.json is generated in appData folder, outside the project, so if we want to include it in the solution, we are going to need to copy and paste it in the folder of CmakeLists.txt
Launching a Configuration
Visual Studio Installer gives the option to install CMake for its environment so if we plan to just use Visual Studio we do not have to worry about installing anything else.
For a more generic version of CMake we can install the program itself that can be downloaded in the official website.
Generate Native Tool Files from Command Line
The simplest version of a build command in cmake is (from version 3.13)
cmake -S . -B _builds -G "Visual Studio 15 2017" -A x64
Where
- -S option to specify the directory where to find CMakeLists.txt . A path value as dot “ . ” like in the example, indicates the current directory.
- -B option to specify the directory where to generate build files.
- -G option to specify the generator to use.
- -A option to specify the target platform.
Build Project from Command Line
Once the native tool files have been generated, as the above example, in _build folder, we can build the project solution with
cmake --build _builds
And that should be all it is needed to generate executables or libraries, depending on our project, ready to be used.
Installing a Library
CMake install is used to generate a version of our CMake driven project configured for reusability in other code bases, typically in the form of a library.
This version will contain just enough CMake variables, code and binary files to be used outside the current source tree.
After calling install on a project we want to include in our source tree, we will not have to call add_subdirectory on the initial code anymore, because we will call add_subdirectory and/or add_package in the folder generated by the install process instead.
The first step is knowing where the install folder will be created. For some reason this will have to be decided at configuration stage, so in the command line we will have to edit CMAKE_INSTALL_PREFIX cache variable:
cmake -H. -B_builds -DCMAKE_INSTALL_PREFIX=_install/config-A
By default the install prefix will point to a generated folder in c:/Program Files/ which is generally not ideal.
After configuration and generation stage, we build the project with the install option
cmake --build _builds --target install
If everything completes correctly we will find our _install/config-A folder ready to be included as subdirectory.
The process of creating an install-ready source tree requires additional configuration which is not listed here. This goes beyond the scope of this article and it will be omitted, but if that turns necessary to someone, they can find instructions in the official install documentation page and a well documented practical example in the CGold packaging project.
Good Practices
Ideal Solution Structure
It is good practice to structure a C++ project similar to the following
├── CMakeLists.txt
├── lib/
│   ├── CMakeLists.txt
│   └── Project1/
│       ├── CMakeLists.txt
│       ├── LibraryType1.h
│       ├── Library1/
│       │   ├── CMakeLists.txt
│       │   ├── Library1.h
│       │   ├── LibraryClass1.cpp
│       │   ├── LibraryClass1.h
│       │   ├── LibraryClass2.cpp
│       │   └── LibraryClass2.h
│       └── Library2/
│           ├── CMakeLists.txt
│           ├── Library2.hpp
│           ├── LibraryClass3.cpp
│           └── LibraryClass3.h
└── app/
    ├── CMakeLists.txt
    └── Project1/
        ├── CMakeLists.txt
        ├── Target1/
        │   ├── CMakeLists.txt
        │   ├── SubSet1/
        │   │   ├── Class1.cpp
        │   │   └── Class1.h
        │   └── main.cpp
        └── Target2/
            ├── CMakeLists.txt
            └── main.cpp
-
lib/ contains target libraries files, app/ contains target executables that can link targets from the previous folder.
Each of them contains folder Project1, but if we are using only one CMake project, then that can be replaced with the respective content. -
The CMakeLists in the root folder main duty is to define the project, find required packages and add lib/ and app/ subdirectories. Then the subdirectories will have a CMakeLists each that will recursively add subdirectories up until an executable/library folder where the CMakeLists will contain the definition of a target, include (source) directories command and link needed libraries.
-
Each Library folder contains a header file with the only purpose to include all the classes defined in the same scope. That can be included in a project file when we need to reference all the classes that belong to that library.
Inspecting a Library/Executable External Symbols
In Windows we can quickly inspect the defined symbols inside a library with Dumpbin tool of the command prompt.
For static libraries we cause the /symbols option:
dumpbin /symbols “path\to\myStaticLib.lib” | findstr "External" | findstr "SECT"
Calling this function will return a set of strings each representing a symbol found in library myLib.lib where also “External” and “SECT” are present in the description.
If SECT is present in the symbol description it means that symbol has been defined, otherwise “UNDEF” will be written instead.
For shared libraries we can use the /exports option:
dumpbin /exports “path\to\mySharedLib.dll”
NOTE: Generating Undefined External Symbols happens
- If we declare a function in the library but not implement it, that will be stored as an undefined external symbol.
- If we use a function inside the library which is defined in another library, that will also be stored as an undefined external symbol.
NOTE: Linking errors will be notified at build stage, even if they were done at configuration stage.
Adding Pre-Compiler Definitions for Build Stage
We can add pre-compiler definitions for build stage for a given target with target_compile_definitions like
target_compile_definitions(myTarget PUBLIC "LOG_PHX_VERBOSE")
In this way, every time the target will be built, even as a dependency, that definition will be included.
The case is different for add_definitions function:
add_definitions(-LOG_PHX_VERBOSE)
That will be active ONLY for the current directory, so if the current directory will be linked as a library, that definition will NOT be used.
Further Good Practices
Are found in Manuel Binna’s Effective Modern CMake page.