Riccardo Loggini
Textures in D3D12 - Part 2
Table of Contents
Still Textures
Since the main article about textures was too long, I dediced to split it in two parts. You can check the first part by following this link.
This second post about textures will go trough filtering, swizzling, gamma correction and practical texture usage in D3D12.
Texture Filtering
In a texture sampling context, Filtering is the set of operations that we perform on the texels surrounding the sampling point, to determine the output color.
As mentioned in the previous sections, filtering is mainly useful when we sample a texture being transformed in size or rotated: in these cases certain filters will prevent aliasing artifacts.
There are different types of filters that we can use in D3D12 (and specified in D3D12_SAMPLER_DESC with a D3D12_FILTER enumeration value).
They differ for complexity and performance cost but we can group them in a set of cases as follows.
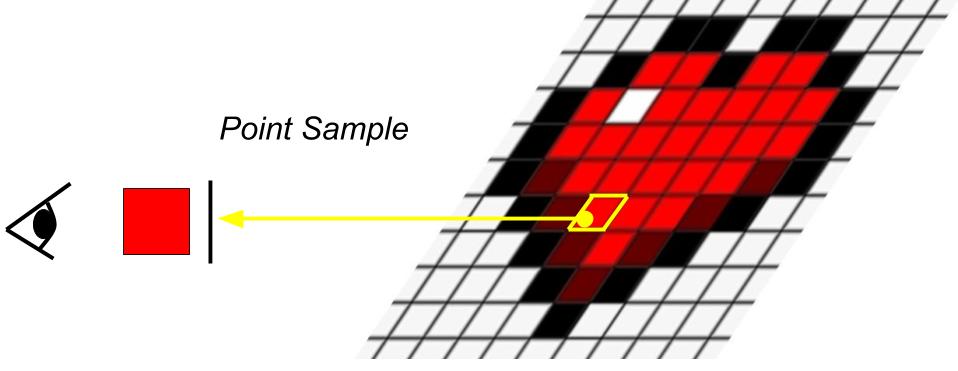
Point
Also called nearest-neighbor filtering, it will pick the value of the nearest texel to the input coordinates. Using this filter during minification (reduction in size) of a texture will bring noticeable aliasing artifacts.
Bilinear
Bilinear filters will pick groups of four nearest texels around the input coordinates of the sample. Then the corresponding colors are combined with a weighted average according to distance.
This filter is very common especially when used to generate mipmaps.

Anisotropic
Anisotropic is usually the highest quality filter we can set in modern real-time graphics applications.
This filter samples the nearest texels to the requested samping coordinates, selecting the ones that more closely match the pixel coverage in texture space.
The differences from using a bilinear filter are evident when the texture normal and the view direction produce a substantial angle: the chosen texels for filtering will not form a square anymore but the shape will adapt to the view perspective.

Swizzling
Swizzling is the operation of storing texels of a texture in an optimized way.
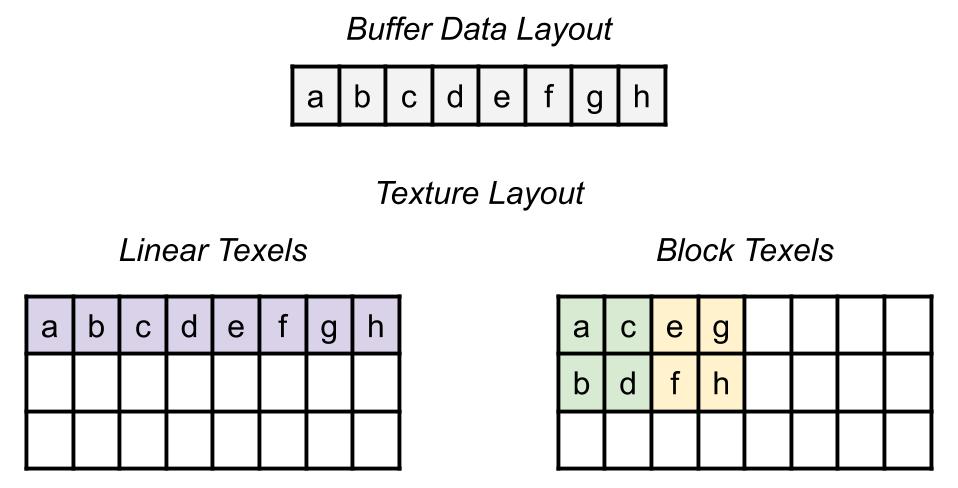
Take for example the case of sampling a texture with a filter that considers a 2 by 2 square of texels. If the texels of the texture are stored linearly, the filtering operation will be slow, because a number of memory jumps will be done by the system to gather all the four components of the square. If instead the texels are stored on a block (square matrix) basis, operations on such texel regions will be faster. This property is also called rotationally invariant locality of neighbouring texels, and the previous example is a case of standardized swizzle pattern.
In D3D12, D3D12_TEXTURE_LAYOUT enumeration specifies the order used to store texels in the texture, which supports textures to be layered out with the standardized swizzle pattern.
For each memory page used by the texture, an “interleave pattern” defines the conversion between pre-swizzled to post-swizzled location of each square of texels in the page.
Gamma Correction
To explain what gamma correction is, we first need to define two types of color space, the domain in which we operate with colors.
Linear Color Space
Linear Color Space is a color domain where mapping between colors and their numerical value is a linear function (straight line). In this domain, light color intensity is simply given by the sum of the intensity of the involved light sources.
Gamma Color Space
Gamma Color Space is a color domain where mapping between colors and their numerical value is either an exponential or logarithmic curve function (and not a straight line). The exponent for the exponential function is called Gamma.
The need of using gamma space arises for two reasons:
-
Human eye is more sensible to darker shades rather than lighter ones: this means that when we are going to compress an image, we want to preserve more darker shades and compress more lighter shades.
-
Screens have a non-linear response to intensity: Cathode-ray tube (CRT) monitors have a natural 2.5 gamma applied and LCD monitors are made to reach gamma 2.2 for human eye perception reasons above.
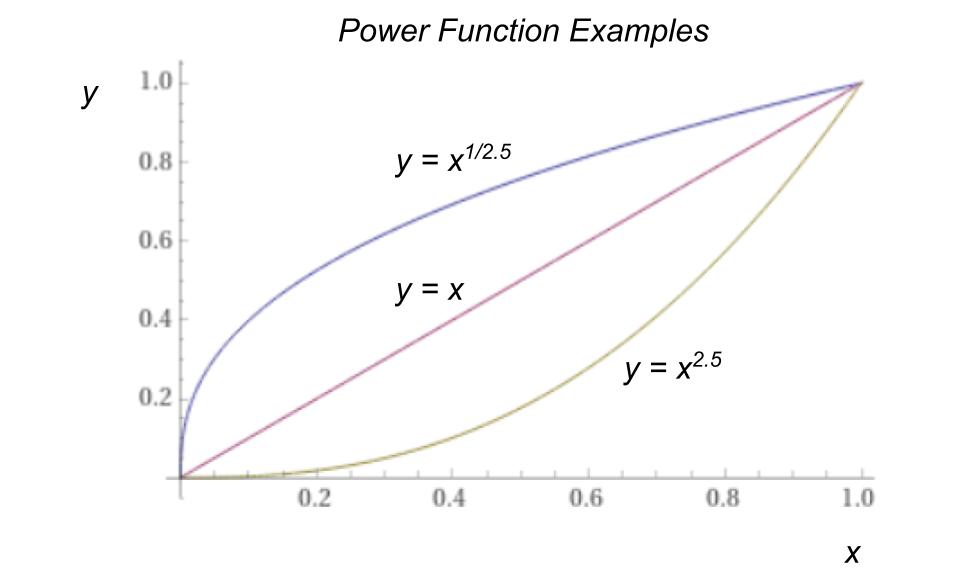
These two facts are handled in computer graphics with Gamma Correction: the color intensity of every pixel is put through a power function.
Gamma Correction
Gamma is the name given to the power applied to the color intensity of texels: a power of 1 will be linear (the color itself), and a gamma of 1/2.2~=0.45 is the value frequently used to store gamma space texels (e.g. in sRGB).
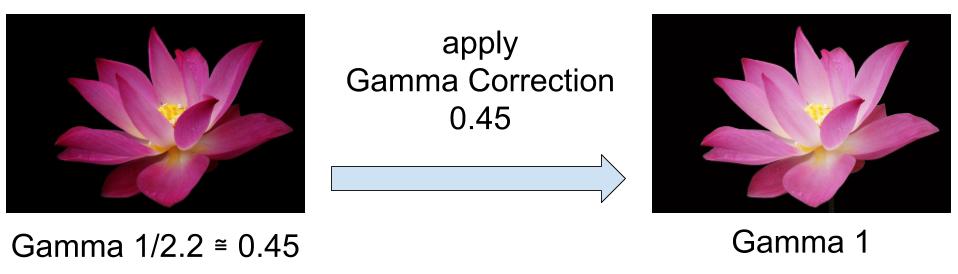
We call gamma correction the inverse process of applying a gamma value.
In the case of LCD monitors, as stated before, they apply a natural gamma to the output image of 2.2, so if we send the input image in gamma space 0.45 like the sRGB format, the monitor will naturally apply a gamma correction to it, and the resulting output image will have a total gamma of 1 (linear space) which is the intended color.
Working with input gamma space images is not a good practice, because the physics of light works in linear space, so the light calculations using such images do not produce an accurate result (they will be darker).
It is nowadays good practice to convert the gamma space images to linear space before start working with them in the graphics pipeline.
Note: Keep in mind that data conversion between linear and gamma space will bring data loss: darker data loss from gamma to linear and brighter data loss from linear to gamma.
The conversion from a gamma corrected value to its linear correspondent is made by:
\[{ x }_{ linear }={ \left( { x }_{ gamma } \right) }^{ 2.2 }\]Still, the definition of sRGB format uses a slightly different version than the usual power-of transfer function.
![]()
The conversion from linear space color intensity to sRGB is:
where $u$ is either $R,\quad G\quad or\quad B$ in linear space.
(source Wikipedia)
Meanwhile the conversion from sRGB to linear is defined as:
\[{ \gamma }^{ -1 }\left( u \right) = \begin{cases} \frac { u }{ 12.92 } & u\le 0.04045 \\ { \left( \frac { u+0.055 }{ 1.055 } \right) }^{ 2.4 } & otherwise \end{cases}\]where $u$ is either $R_{sRGB}\quad or\quad G_{ sRGB }\quad or\quad B _{ sRGB }$.
Note: In D3D12 by specifying that a shader resource view’s texel format is sRGB, this information will be used by samplers.
A linear sampler that samples on the referenced resource, knowing the texel format to be sRGB, it will automatically convert and return the sampled value in linear space (will apply gamma correction) by itself!
Practical Texture Usage
In D3D12 textures are resources, defined by D3D12_RESOURCE_DESC structure.
Most of the times, we first need to load texture content from a file.
There are multiple libraries that can perform this operation, but in this case we just mention the stb library (written in C), the mango library, and DirectXTex by Microsoft which makes use of Windows APIs (so it is not really platform agnostic).
The following example will use DirectXTex for demonstration purposes.
// Informations about the texture resource
DirectX::TexMetadata metadata;

// Content of the texture resource
DirectX::ScratchImage scratchImage;

DirectX::LoadFromDDSFile(
“MyTexture.dds”,
DDS_FLAGS_FORCE_RGB,
&metadata,
scratchImage)
We are assuming to load a texture from a dds file, and DirectXTex provide the function LoadFromDDSFile but of course there are others for TGA, HDR, BMP, JPEG, PNG, TIFF, and HD Photo. For more details you can visit DirectXTex GitHub Page.
Once this operation will be done, metadata variable will contain details about the loaded texture and the scratchImage will contain the texture’s data.
D3D12_RESOURCE_DESC textureDesc = {};

textureDesc = CD3DX12_RESOURCE_DESC::Tex2D(
metadata.format,
static_cast<UINT64>( metadata.width ),
static_cast<UINT>( metadata.height ),
static_cast<UINT16>( metadata.arraySize ) );
Once we loaded the image, we use CD3DX12_RESOURCE_DESC structure, from the D3DX12 header library, to initialize the texture description object using the texture information loaded in the metadata variable.
Microsoft::WRL::ComPtr<ID3D12Resource> textureResource;

device->CreateCommittedResource(
&CD3DX12_HEAP_PROPERTIES(D3D12_HEAP_TYPE_DEFAULT),
D3D12_HEAP_FLAG_NONE,
&textureDesc,
D3D12_RESOURCE_STATE_COMMON,
nullptr,
IID_PPV_ARGS(&textureResource))
The texture description will be the input to allocate memory on a committed resource, big enough to contain our data in GPU. This is done in a default heap (that has GPU exclusive access, as mentioned in the previous article about resources).
Textures must be in the D3D12_RESOURCE_STATE_COMMON before being used on a COPY queue (as a target for a copy operation) something that will happen after some code below.
std::vector<D3D12_SUBRESOURCE_DATA> subresources( scratchImage.GetImageCount() );

const Image* pImages = scratchImage.GetImages();

for ( int i = 0; i < scratchImage.GetImageCount(); ++i ){

auto& subresource = subresources[i];
subresource.RowPitch = pImages[i].rowPitch;
subresource.SlicePitch = pImages[i].slicePitch;
subresource.pData = pImages[i].pixels;
}
We fill a vector of D3D12_SUBRESOURCE_DATA with the information about the texture subresources, extracted from the file and stored in scratchImage.
Having now an array of subresources in a format that D3D12 understands we can proceed in uploading it to the GPU resource textureResource that was allocated before.
// Copy texture surbesources

// Resource must be in the copy-destination state.
CD3DX12_RESOURCE_BARRIER transitionBarrier = CD3DX12_RESOURCE_BARRIER::Transition( textureResource.Get(),
D3D12_RESOURCE_STATE_COMMON,
D3D12_RESOURCE_STATE_COPY_DEST );

myCmdList->ResourceBarrier(1, &transitionBarrier);
We first transition the destination resource to D3D12_RESOURCE_STATE_COPY_DEST state, knowing that the previous state was COMMON, so that it is ready to accept new content in it.
UINT64 requiredSize = GetRequiredIntermediateSize( textureResource.Get(), 0, subresources.size() );

// Create a temporary (intermediate) resource for uploading the subresources
ComPtr<ID3D12Resource> intermediateResource;

device->CreateCommittedResource(
&CD3DX12_HEAP_PROPERTIES( D3D12_HEAP_TYPE_UPLOAD ),
D3D12_HEAP_FLAG_NONE,
&CD3DX12_RESOURCE_DESC::Buffer( requiredSize ),
D3D12_RESOURCE_STATE_GENERIC_READ,
nullptr,
IID_PPV_ARGS( &intermediateResource )
);
A committed resource in an upload heap is created with CreateCommittedResource to act as the intermediate resource, to be able to upload the content from CPU to GPU. The necessary memory size is retrieved by using GetRequiredIntermediateSize function on our textureResource.
UpdateSubresources( m_d3d12CommandList.Get(), textureResource.Get(), intermediateResource.Get(), 0, 0, subresources.size(), subresources.data() );
Finally we can use the UpdateSubresources function from D3D12 that internally will do the following
-
Memory mapping between our “subresources” and “intermediateResource” (memory mapping is explained in my previous article about resources)
so our subresources will be uploaded to the upload heap. -
Copy operation of content from
intermediateResourcetotextureResource
Note: Useful to repeat in this article, that the whole intermediate resource copy operation is acted because a default heap is in GPU dedicated memory is faster to operate on compared to a resource in an upload heap (which resides in GPU shared memory). The only downside is that a default heap has GPU exclusive access, and that is why to upload content into it from the CPU we need to pass through an intermediate resource copy operation.
Referencing a texture in the pipeline
To use the texture we just created, we need to start from a shader resource view (SRV) referencing it. The SRV will reference the texture resource in the graphics pipeline.
As many other objects in D3D12, we start from a description object D3D12_SHADER_RESOURCE_VIEW_DESC with details about the represented texture, such as texture type (1D, 2D, 3D, Cube, etc.), texel format and mipmap levels.
// Create an SRV that uses the format of the original texture.

D3D12_SHADER_RESOURCE_VIEW_DESC mySRVDesc = {};

mySRVDesc.Format = DXGI_FORMAT_R32G32B32A32_FLOAT;
mySRVDesc.Shader4ComponentMapping = D3D12_DEFAULT_SHADER_4_COMPONENT_MAPPING;
mySRVDesc.ViewDimension = D3D12_SRV_DIMENSION_TEXTURE2D;
mySRVDesc.Texture2D.MipLevels = numMipLevels;
When we create a D3D12_SRV_DIMENSION_TEXTURE2D the system will consider the field Texture2D of type D3D12_TEX2D_SRV from the description object, that stores additional details about our resource, such as the considered mip levels.
ComPtr<ID3D12DescriptorHeap> myDescHeap; //assuming to have a CBV_SRV_UAV descriptor heap already instantiated

// Taking the first descriptor of the heap as a simple example
D3D12_CPU_DESCRIPTOR_HANDLE mySRV_CPU = myDescHeap->GetCPUDescriptorHandleForHeapStart();
D3D12_GPU_DESCRIPTOR_HANDLE mySRV_GPU = myDescHeap->GetGPUDescriptorHandleForHeapStart();

D3D12_CPU_DESCRIPTOR_HANDLE myTempSRV_CPU; //present only on CPU to collect descriptor changes

CreateShaderResourceView(myTexture.Get(),&mySRVDesc, myTempSRV );
To create an SRV in GPU memory, we need to start from allocating an CBV_SRV_UAV descriptor heap ID3D12DescriptorHeap and referencing a descriptor from it, that here is not shown for brevity.
You can learn more about descriptors allocations in the Lesson 3 of 3dgep.com .
Allocating a descriptor will fill some memory in GPU and create a memory mapping on CPU so that we can retrieve a D3D12_CPU_DESCRIPTOR_HANDLE from it, to be able to reference it in the rest of the code. We can achieve this because the descriptor heap is CPU visible (allocated in GPU shared memory).
Here we create a second descriptor myTempSRV, that only lives in CPU memory, so we can perform a series of operations on it and then safely update the original GPU descriptor.
The copy operation will be done later.
We created the SRV by using the CreateShaderResourceView function, from the SRV description object, the descriptor handle, and referencing our texture with it at the same time.
Next we need to bind the SRV to the root signature, so we start by defining a root table with a descriptor range containing our SRV.
We could also have used a root descriptor, but using a root table is a more common operation and has been chosen for demonstration purposes.
CD3DX12_DESCRIPTOR_RANGE1 myTextureDescriptorRange( D3D12_DESCRIPTOR_RANGE_TYPE_SRV, 1, 0, 0, D3D12_DESCRIPTOR_RANGE_FLAG_DESCRIPTORS_VOLATILE );


CD3DX12_ROOT_PARAMETER1 myRootTable;
myRootTable.InitAsDescriptorTable( 1, &myTextureDescriptorRange );
// Init other root signature params
CD3DX12_VERSIONED_ROOT_SIGNATURE_DESC rootSignatureDesc(
numRootParameters, rootParameters,
numStaticSamplers, &staticSamplers
);

// Continue with root signature creation, PSO, etc.
Here a CD3DX12_DESCRIPTOR_RANGE1 object from the D3DX12 library has been used to reference the SRV to the root table of type CD3DX12_ROOT_PARAMETER1 that then will be part of the root signature.
Finally we need to bind the SRV to the root signature.
// Update descriptor in GPU with the corresponding CPU descriptor that we just bound as our texture’s SRV

myD3D12Device->CopyDescriptorsSimple(1, mySRV_CPU, myTempSRV_CPU,
D3D12_DESCRIPTOR_HEAP_TYPE_CBV_SRV_UAV);

myCmdList->SetGraphicsRootDescriptorTable(0, mySRV_GPU);
We used ID3D12Device::CopyDescriptorsSimple to update the descriptor in GPU with the one we used to reference our texture. This operation would make more sense in a real case, when we are updating multiple GPU descriptors after a series of edits on CPU side, possibly using ID3D12Device::CopyDescriptors method instead.
ID3D12GraphicsCommandList::SetGraphicsRootDescriptorTable method is the last call for the operations we need to reference our texture in the graphics pipeline, it will reference the descriptor on the GPU (that now references our texture) in the command list.
This ends the chapter about loading a texture in the graphics pipeline.
There are of course many details in between, but for more information about the root signature, the pipeline state object or resource handling, you can visit my previous articles.
There are many things to say about textures in graphics and in D3D12, here briefly listing just part of them.
If you are reading this, I thank you and hope that at least part of this content was useful to you at least as much as it is to me. :)
Sources
-
3DGEP - Part 4 https://www.3dgep.com/learning-directx-12-4/
-
Official D3D Documentation
https://docs.microsoft.com/en-us/windows/win32/direct3ddds/dx-graphics-dds-pguide -
Garage Games - Texture Compression
http://docs.garagegames.com/torque-3d/official/content/documentation/Artist%20Guide/Formats/TextureCompression.html -
Kinematic Soup - Gamma and Linear Space
https://www.kinematicsoup.com/news/2016/6/15/gamma-and-linear-space-what-they-are-how-they-differ -
Handles Pixels - Understanding Gamma Correction
https://handlespixels.wordpress.com/2018/02/06/understanding-gamma-correction/ -
FreeImages.com
https://www.freeimages.com/ -
Colour-Science.org - sRGB Uncertainty
https://www.colour-science.org/posts/the-importance-of-terminology-and-srgb-uncertainty/ -
Cambridge In Colour - Gamma Correction
https://www.cambridgeincolour.com/tutorials/gamma-correction.htm -
Wikipedia - Mipmap aliasing comparison
https://commons.wikimedia.org/wiki/File:Mipmap_Aliasing_Comparison.png -
Wikipedia - Texture Filtering
https://en.wikipedia.org/wiki/Texture_filtering#Linear_mipmap_filtering -
Newcastle University - PS3 Introduction to GCM
https://research.ncl.ac.uk/game/mastersdegree/workshops/ps3introductiontogcm/GCM%20Texturing.pdf -
Florida State University - Image Processing - Gamma Correction https://micro.magnet.fsu.edu/primer/java/digitalimaging/processing/gamma/index.html